Pages

Friday, August 30, 2013

Mozzy Net With Fabric Birds

Another baby project, I helped my daughter to get the nursery ready for my first grandchild. This is a project I enjoyed very much. It is one of those décor items that just gives a little class to baby room.

I had an old lamp cover that was waiting for the right opportunity to become something awesome.

The list:
1 Lamp hoop
24y Tulle
Binding tape
6y of Ribbon (4 different colors)
Scrap fabric
Needle & Thread
 
I started by dividing the tulle in 2 parts, then I folded it in half so the 2 tops would make a loop. I tied them together with string/yarn. I then measured 15" down for placement of the hoop.


I cut the 4 ribbons in different lengths and tested it by pinning to the hoop.

 
I chose Green Dark & light Pink and soft Yellow Ribbon

The binding tape was measured to make an encasing for the hoop. I cut 2 pieces, the 1st was used to attach the colored ribbon to. I made 4 sections to hang from the hoop. This will be attached to the outside of the net.

 
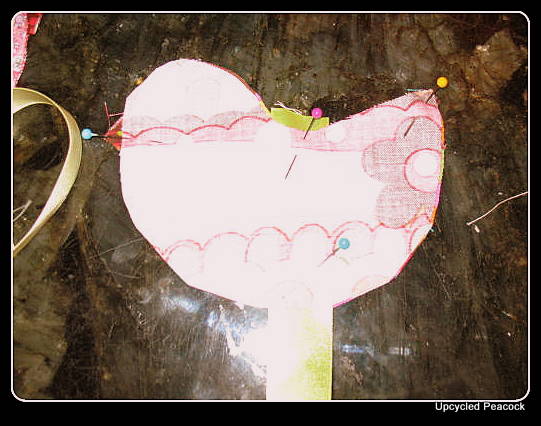
Little fabric birds were cut from leftover fabric, see the onesies and glider posts.
 
 
I used some of the ribbon in different lengths again to make them hang. A beak was made from a square and the tail from fabric strips.

 
I pinned the ribbon, beak & tail to the right side of one bird, to the inside and placed the other half rightside together

 
The seam was done and I left the 1" at the bottom open where the ribbon came through to turn it right side out and insert the stuffing.
 
I ruffled the tail feathers and stuffed them, the bottom was sewn closed, I should have done it by hand but I was in hurry to get it done before the baby shower.


I made 5 birds, 4 to hang in between the outside ribbon and one for right in the middle. The ribbon ends was attached to the tulle loop. I needed hand for the next step. I hung the net to a hook from the ceiling and had my husband hold the hoop (the binding was already attached to the inside circle) while I tacked is it loosely to get it in place, about 15 inches from the top, making sure the tulle was spaced evenly around the hoop.
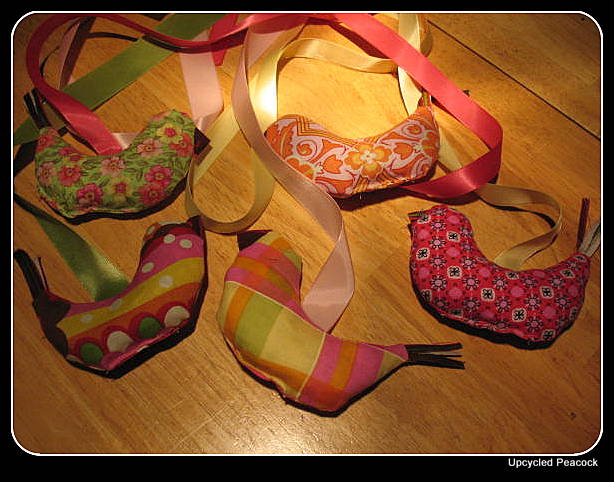
 
The bird ribbons were sewn into place to the inside of the hoop and then I attached the outside binding with the colored ribbon , spaced evenly between the birds. It was a time consuming process but I couldn't think of an easier way to do it. I hand stitched the topside of the binding first and then the bottom to have the hoop encased by it. Last I seared the ribbon ends so would not fray.
Feel free to give advise for future reference.


I am happy to say that my little granddaughter is already looking at the little birds above her crib. I am so Blessed to be able to share this with her. 
 
 
BTW I painted the tree and the puffballs are from her aunt's wedding, she sprayed them green & pink for the baby shower and now they are part of the nursery.

Monday, August 26, 2013

Blue African Porch Furniture


My daughter found this set when one of their neighbors moved and left it behind. It looked kind of worn out and tired, but when she brought it to me I saw the potential to brighten up their front porch a little.

The worn table that I sanded and scraped to get most of the old paint off.


I believe it was made out different woods and the legs had to be glued down and secured with new nails. I left some of the original paint on because I didn't know yet what I was going to do with them.


Lowe's had blue OOPS paint and that what it became. We painted 2 coats to cover evenly as base coat.

I taped the areas where I planned the design, it was inspired by a piece of fabric I had bought to make kofi hats with
ties.

I chose a bright orange for the background and filled the space inside he tape.
 
Butternut for the 2nd layer of design. Painted freehand.
Black was used as the accent color, it gives the design a bold & dramatic look.
Still freehand.
I started to add black accent to the trim areas in the back and legs.


I sanded the edges for the rustic "worn" look, this was done on the legs as well.
I removed the tape to border the design.


I finishes each design with a black border and added some color to the legs.


I sealed the paint-job with clear-coat of polyurethane for protection against the elements.
This set was one of the more fun ones because the colors were so bright & happy to work with. I enjoyed refinishing this set for my daughter. They love it and she complemented it with clay pots on her porch.


Sunday, August 25, 2013

Country Sunflowers - Painting

Country Sunflowers

I started this project to complement the décor for my 2nd daughter's wedding. She had a country wedding with sunflowers. We bought a roll of burlap for all the decorating we had to do for the wedding, she was her own wedding planner.

I started by choosing the subject and what better way than using your own flower. We planted sunflowers to use in the wedding. Only a few made it as the chipmunks discovered the seeds.


I used acrylics to for this painting. It is more difficult to paint on burlap as one would imagine, I was glad the theme for the wedding was rustic, country, vintage, so the imperfections in the burlap was celebrated.

 
Green background done and I left a 2" border unfinished because the frame was not planned yet.  


I filled it in with leaves and the big sunflowers but left the some bare background.


My husband is very talented with building things and being creative when I present him with a problem, the frame. We had a couple of pallet projects and used the sanded planks to build a frame, to keep the burlap stretched and flat.


Finished painting, framed and ready to hang. It was a beautiful addition to the rest of the wedding décor.

 
 This I where it hangs now, happy in my kitchen for now.


Thursday, August 8, 2013

Country Wedding

We did all the wedding planning for both daughter's weddings and had blast creating everything ourselves. I will be posting some step by step instructions and in other cases just pictures of what we made. It was most enjoyable, and I look forward to sharing the experience.


Country Sunflowers

http://upcycledpeacock.blogspot.com/2013/08/country-sunflowers-painting_25.html


We used a lot of burlap for this wedding, The letters were painted with acrylic.


Cornhole boards

Sunday, July 14, 2013

SEE-SAW

We always get the stumps and branches form cut-down trees from our neighbors because we are known for our fires, there is usually a bit of smoke coming from the backyard. We created our own bit of "country" in the city.
 
That being said my husband came home a few weekends ago with a load of wood. The stumps were there for a few days and I knew my husband was up to something when he told me he had a plan. I envisioned a totempole, but he saw a "teeter-totter".

This is what followed:

6ft stump planted about 3ft deep
Top edges worked off to allow up-and-down movement


10" deep hole drilled for 15x3/4" lag bolt.


Seats were cut from a piece od 10"x2"x8'


having fun in the backyard

The handle was made from our outside broomstick.

Monday, July 1, 2013

Beautifying The Glider

Beautifying The Glider
 
Blessed to find a friend on my yardsail route Saturday. I told her I was looking for baby-stuff, in particular a glider or rocking chair. Co-incidence?  She had one in her spare bedroom and her boys are older so she won't use it anymore, it is blue, but I can have it. As it works out the gifter of the glider happened to be the wife of my daughter's boss. God provides in mysterious but wonderful ways.


Another project is born.

 
Daddy enjoying the glider before I give it a facelift.

7/4/13 - Since we don't want to do all this over again if they have a little boy I decided to keep it neutral with a removable twist. I found Khaki denim at Wal-Mart for $2.00 a Yard - would only need 2 and some left-over fabric from the onesie project. Baby is due in less that 10 days so I better get moving.


7/5/13 Turns out the blue was also a re-do because the original upholstery was pink. It was not the shade I like and I had already bought the khaki so I used the blue as templates for my fabric.


Footstool before


Original pink cushion.

Seat cover used as template.
Strips of fabric with piping


Backside of footstool with binding.
I decided to use a green accent as piping for the seats and footstool, I made my own by cutting the green in 2" strips and folding it over the piping. I used the zipper foot to stitch it close to the piping.


Start of the piping process.


Fabric first then piping close to the edge. Stapled to footstool.

I used the piping to finish the edge of the stool to have a universal look throughout the project. I pinned the piping on the inside edges of the cushions and gathered the fabric on the curves to give it a nice round edge.


I am putting a bird applique on the back cushion, to match the birds in the mozzy net. I used the green from the piping and cut a the bird a little bigger than the one in my accent fabric, same with the tail feathers. The tail feathers will repeat on the seat and footstool.


My 8yo drew the bird I used as template, she loves being involved in the creative process.

Scraps used from other projects, to get a layered look.
I machine stitched the smaller pieces to the green background. I did not finish the edges to get the "worn" look. I then placed the applique on the cushion and used embroidery yarn in different colors hand-stitching to attach it.   


Applique bird design on back cushion.
 
 I used 4" wide strips to make the straps, I cut one piece of 4'x4" and stitched it right sides together. I cut it into 4 pieces that I finished on one side slanting toward the folded side. I then turned each piece inside-out and stitched it to the cushion. I would have done this in one step when I did the piping but since we may change the applique to suit boy this will be easy to remove and replace.
 
Ties to secure the cushion to the glider
 

I will post the final product when I the glider delivered and ready for use.