Pages

Saturday, December 28, 2013

Denim satchel & wallet.

Our youngest wanted to make something special for her older sisters for Christmas and decided on a denim card holder for one & satchel for the other. Good choice as it fits their personalities and style perfectly. Needles to say they were very impressed & pleased. This was her first lesson in embroidery, and she loved it.
 
 
 We cut flowers from other fabric & she sewed them by hand with an embroidered topstitching. The embroidery was continued all over the denim.

 
 We sewed pockets on the inside from contrasting fabric & attached an elastic hairband to hook over the button to close. She added zig-zag to finish the look.

 
Embroidered satchel with elastic & button to close.


Sunday, November 24, 2013

Peach-Pit Trip

We hit the road today to get the peach pits for my new kitchen floor. It has been a dream since childhood to have a peach-pit floor one day. That day has come! With the water damage & sagging we had in our kitchen, we had to replace the floor from the crawlspace up. So I get at least a little section of peach pits. Well this is where the search took us. SC is peach country and we thought it would be easy to get pits, but it was easier said than done. We finally got hold of a non-commercial farmer who didn't clean his orchards after every season. It was a Sunday road-trip worth of family time. We drove 60 miles to find the orchard and then had to pick-up pits from under the trees. At first we thought the bigger trees would have more, but working our way back to the car we found the smaller trees had the most & freshest pits. We also found animal traps in the orchard.  We read some scripture, prayed & enjoyed God's creation, picked the last of the season's wild pear/apples (they look like apples & taste like pears) and saw the biggest deer stand ever on the way back home.
This day will be remembered every time we step on our peach-pit floor.
A good day!
 
Pear-Apples, they were delicious. With the Carolina-Blue Sky as backdrop.

Peach pits found by scratching the leaves open.

Small animal trap.

Biggest deer-stand ever! (I know it is not a stand but I like to tease my sons in law)

The prized peach pits/kernels clean & ready for the kitchen project.
 

Tuesday, November 19, 2013

Wise Old Tree

And so a new season begins, and the old tree seems to enjoy every moment of it, she heard the girls' secrets when they swing, she sees all the neighbors when they take their dogs for walks, sees the joggers run by, people leaving & coming back. She saw our girls grow up, kissing boyfriends while saying goodbye, heard weddings being planned, saw all the special occasion pictures taken under her.
A lifetime of memories and all the memories still to be made. Glad to have you in our front yard. 


Saturday, November 9, 2013

Morning message!

This was my morning message for today, inside the egg carton!


Psalm 118:24
 
This is the day the Lord has made: let us rejoice and be glad in it.
 
My prayer is to start each day like this.

Tuesday, November 5, 2013

Kitchen Hutch Before & After

We are in the process of re-doing our kitchen floor and this old hutch was just too big to move. It has been a source of frustration for us for a long time and the kitchen seemed too small for such a big piece.
Problem solved! We cut the top section off and this will be used in my workroom as a storage space. This also made room for my sunflower painting that has been wilting out of sight. So glad we did this.
Before - Old Hutch reaching for the ceiling
 
 My Country Sunflowers found a wall in my kitchen.
 
After - Half the Hutch now server with some needed wall space.
 

Antique Shopping Sites

After a hectic couple of weeks we went sightshopping this past weekend this is where we ended up in a town called Red Cross NC. I found a treasure or 2 and will post as they become functional. For now feast your eyes on this.
 
Red Cross NC  Nov 2013


Red Cross NC Nov 2013
 

Mt Pleasant NC Nov 2013


Waxhaw NC 10 Nov 2013
 

Sunday, September 15, 2013

Buck & Doe Cornhole Boards

Buck & Doe Cornhole Boards
 
Custom Cornhole for entertaining the wedding guests. My husband built the boards and I painted the designs. I made the bags and the whole family pitched in with sanding the boards and dividing the corn and filling the bags.
 
 
One sheet of plywood, cut to size for 2 boards. We loved the knots in the wood because we wanted the old country look.


2 x 4's Were used for the frame, the sheets were screwed & glued into place
 
 
The legs were screwed into the back side and made to fold in for transport & easy storage.


The family helped to separate the corn & sunflower seeds we had a bag of mix feed (the groom bought for his critters)

 
The wooden surface was sanded & then I stenciled the buck & doe love design in green & purple. I made a stencil with hard plastic I got from an old folder. I painted the holes & created a frame in the same colors.

 
After the painting was done we sealed the design & wood with polyurethane, about 3-4 coat with light sanding between coats.


The cornhole game was a big hit at the wedding and the custom design complemented the whole country theme.


 I made the cornhole bags out of strong cotton in the same colors as the designs. They are all double stitched for extra durability.
 
 
Cornhole bags in olive green & eggplant purple.

 
The bags are available on Etsy (SOLD 9/22/14) but send me a message if you want custom colors


Friday, August 30, 2013

Mozzy Net With Fabric Birds

Another baby project, I helped my daughter to get the nursery ready for my first grandchild. This is a project I enjoyed very much. It is one of those décor items that just gives a little class to baby room.

I had an old lamp cover that was waiting for the right opportunity to become something awesome.

The list:
1 Lamp hoop
24y Tulle
Binding tape
6y of Ribbon (4 different colors)
Scrap fabric
Needle & Thread
 
I started by dividing the tulle in 2 parts, then I folded it in half so the 2 tops would make a loop. I tied them together with string/yarn. I then measured 15" down for placement of the hoop.


I cut the 4 ribbons in different lengths and tested it by pinning to the hoop.

 
I chose Green Dark & light Pink and soft Yellow Ribbon

The binding tape was measured to make an encasing for the hoop. I cut 2 pieces, the 1st was used to attach the colored ribbon to. I made 4 sections to hang from the hoop. This will be attached to the outside of the net.

 
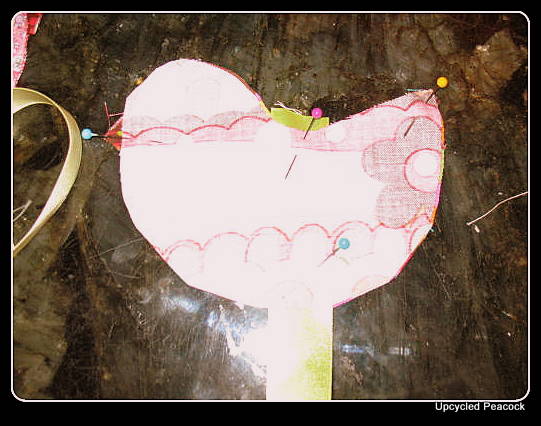
Little fabric birds were cut from leftover fabric, see the onesies and glider posts.
 
 
I used some of the ribbon in different lengths again to make them hang. A beak was made from a square and the tail from fabric strips.

 
I pinned the ribbon, beak & tail to the right side of one bird, to the inside and placed the other half rightside together

 
The seam was done and I left the 1" at the bottom open where the ribbon came through to turn it right side out and insert the stuffing.

 
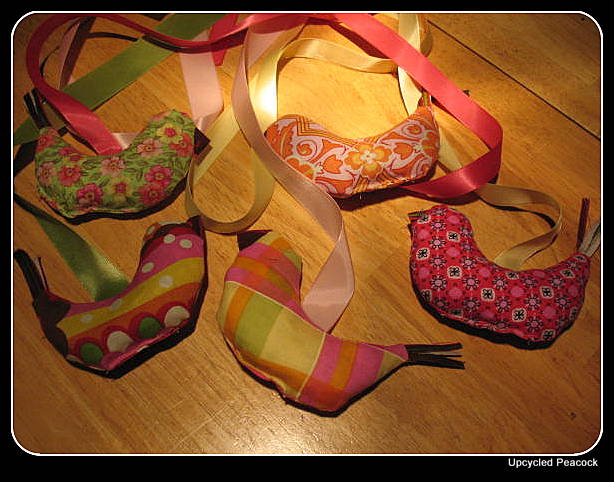
I ruffled the tail feathers and stuffed them, the bottom was sewn closed, I should have done it by hand but I was in hurry to get it done before the baby shower.


I made 5 birds, 4 to hang in between the outside ribbon and one for right in the middle. The ribbon ends was attached to the tulle loop. I needed hand for the next step. I hung the net to a hook from the ceiling and had my husband hold the hoop (the binding was already attached to the inside circle) while I tacked is it loosely to get it in place, about 15 inches from the top, making sure the tulle was spaced evenly around the hoop.

 
The bird ribbons were sewn into place to the inside of the hoop and then I attached the outside binding with the colored ribbon , spaced evenly between the birds. It was a time consuming process but I couldn't think of an easier way to do it. I hand stitched the topside of the binding first and then the bottom to have the hoop encased by it. Last I seared the ribbon ends so would not fray.
Feel free to give advise for future reference.


I am happy to say that my little granddaughter is already looking at the little birds above her crib. I am so Blessed to be able to share this with her. 
 
 
BTW I painted the tree and the puffballs are from her aunt's wedding, she sprayed them green & pink for the baby shower and now they are part of the nursery.

Monday, August 26, 2013

Blue African Porch Furniture


My daughter found this set when one of their neighbors moved and left it behind. It looked kind of worn out and tired, but when she brought it to me I saw the potential to brighten up their front porch a little.

The worn table that I sanded and scraped to get most of the old paint off.


I believe it was made out different woods and the legs had to be glued down and secured with new nails. I left some of the original paint on because I didn't know yet what I was going to do with them.


Lowe's had blue OOPS paint and that what it became. We painted 2 coats to cover evenly as base coat.

I taped the areas where I planned the design, it was inspired by a piece of fabric I had bought to make kofi hats with
ties.

I chose a bright orange for the background and filled the space inside he tape.
 
Butternut for the 2nd layer of design. Painted freehand.
Black was used as the accent color, it gives the design a bold & dramatic look.
Still freehand.
I started to add black accent to the trim areas in the back and legs.


I sanded the edges for the rustic "worn" look, this was done on the legs as well.
I removed the tape to border the design.


I finishes each design with a black border and added some color to the legs.


I sealed the paint-job with clear-coat of polyurethane for protection against the elements.
This set was one of the more fun ones because the colors were so bright & happy to work with. I enjoyed refinishing this set for my daughter. They love it and she complemented it with clay pots on her porch.